 qBittorrent is a reliable torrent client for those who prioritize security and efficiency. In this guide, I'll focus on installing qBittorrent-nox—a feature-rich and lightweight version of qBittorrent that doesn't require a graphical environment and can be controlled via a WebUI, making it more suitable for servers. The WebUI interface provides efficient management of qBittorrent through a web browser.
Installation
Let's start the installation of qBittorrent-nox with the command below:
sudo apt install qbittorrent-nox
Creating a Separate System User and Group
To enhance security, qBittorrent-nox should run as an unprivileged user. Creating a systemd service unit facilitates this, as it operates in the background and is initialized on system boot.
Execute the following command to create a user, group, and directory for qBittorrent-nox (for a system user, the directory is not automatically created):
sudo adduser --system --group --home /home/qbittorrent-nox qbittorrent-nox
--system indicates that this is a system user who does not possess all the capabilities of a regular user.
--group creates a group with the same name as the user and adds the user to this group.
--home /home/qbittorrent-nox creates the home directory.
Add Your User to the Group (Optional)
To ensure your account has access to files that qbittorrent-nox will download (for example, if you want to save them in the qbittorrent-nox user's home directory), add yourself to the qbittorrent-nox group:
sudo adduser your-username qbittorrent-nox
Replace your-username with your actual username.
Creating the systemd Service File
Create a new systemd service file to define how the qBittorrent-nox service should operate:
sudo nano /etc/systemd/system/qbittorrent-nox.service
Enter the following content into the file:
[Unit]
Description=qBittorrent Command Line Client
After=network.target

[Service]
Type=forking
User=qbittorrent-nox
Group=qbittorrent-nox
UMask=007
ExecStart=/usr/bin/qbittorrent-nox -d --webui-port=8080
Restart=on-failure

[Install]
WantedBy=multi-user.target
Save and close the file by pressing CTRL+O then CTRL+X.
Reloading systemd daemon
To activate the new service, reload the systemd daemon:
sudo systemctl daemon-reload
IMPORTANT: For older versions of qBittorrent (< 4.6.1), the default username/password is: admin/adminadmin
For newer versions (> 4.6.1) qBittorrent will generate a temporary password and display it in the console, so temporarily change the qbittorrent-nox user's shell to Bash:
sudo usermod --shell /bin/bash qbittorrent-nox
Switch to the qbittorrent-nox user:
sudo -u qbittorrent-nox /bin/bash
Start qbittorrent-nox
qbittorrent-nox
Answer the license agreement question and check your temporary password.
Accessing the Web UI
Access the qBittorrent Web UI via your browser by entering your server's IP address followed by the port number (8080), for example 192.168.1.10:8080
It is extremely important to change the default credentials for security purposes. Go to Tools>Options>Web UI>Authentication in the web interface. Here you can set a custom username and, critically, your own password. This step ensures that your qBittorrent web interface is protected and accessible only to individuals with the correct credentials, and the password will always be the one you set.
After changing the password and saving the settings, return to the console, press Ctrl+C, and our running qbittorrent-nox will close. Now exit the qbittorrent-nox account by executing the command:
exit
Restoring the qbittorrent-nox User's Shell to a Secure State
This is a very important step! Always return the system user's shell to a secure state to prevent unauthorized interactive login:
sudo usermod --shell /usr/sbin/nologin qbittorrent-nox
Starting and Enabling
Now start the qBittorrent-nox service and enable it to start on boot:
sudo systemctl enable qbittorrent-nox
sudo systemctl start qbittorrent-nox
It is recommended to check the status to ensure the service is running:
systemctl status qbittorrent-nox
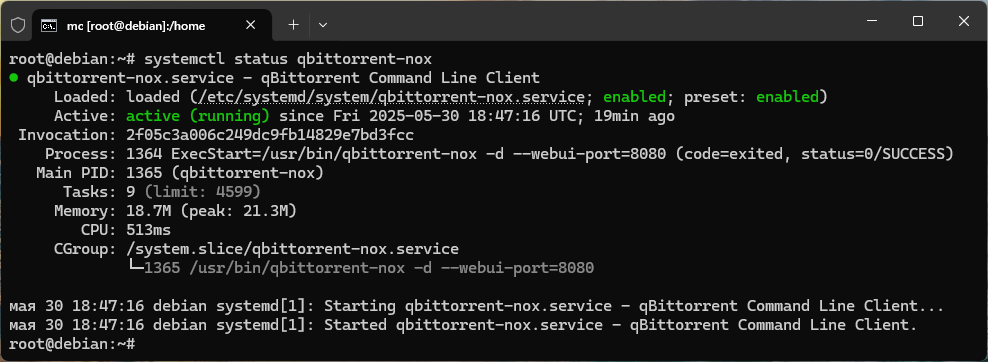
That's all. I hope the article was helpful. If you have any questions or recommendations, I'll be glad to see them in the comments.
Thank you for this guide, it was really useful!
Glad I could help you
Do you know any reason why Blackhole monitored folders are not working. I have the same permissions applied to the blackhole folders as I do my save folder, and everything works except the watched folders do not detect when a torrent is dropped in. I had installed qBittorrent previously, it was working fine, then uninstalled so I could then install nox version. I did so, and cannot find anything in a log folder or anywhere that tells me if it is even looking at the watch folders. I do see in the webUI's Excecution log tab (view > Log), it shows this every time I start the service:
Watching folder: "/mnt/3TB-R1/qBDL/Blackhole/Sonarr"
It has 3 other entries for other watched folders. None of them are working.
User=qbt
Group=media-managers
Permissions on the folders = owner is me, group is media-managers and permissions are u=rwx,g=rwx,o= (no permissions for other users). This works for the save path. Works for Radarr/Sonarr/Lidarr's similar but separate users who watch the save path folder from qbit-nox. It's like watch folders just are not actually being watched.
Internet doesn't seem to have the explanation. Any help would be greatly appreciated.
Oh my god thank you so much I have been trying to install thise for three days, and I could not get the permissions to work and be able to connect to the webui at the same time, no clue why. Thank youuuuu
If user was created as a nologin system user, all sorts of errors will follow.
qbittorrent-nox[]: Could not create required directory '/nonexistent/.cache/qBittorrent'
This shit was written as a desktop program and not a proper service!